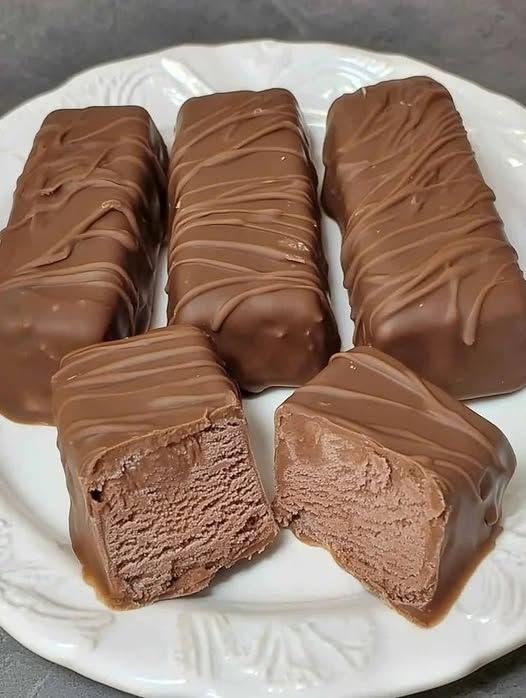
These Homemade Chocolate Protein Bars are chewy, fudgy, and taste just like a decadent candy bar—but they’re packed with clean ingredients and zero refined sugar. They’re the perfect pre- or post-workout snack, or a healthy dessert to keep in the fridge for when those chocolate cravings hit.
Making your own protein bars is not only more affordable than store-bought versions, but you also get to control exactly what goes into them.
The Grocery List (Ingredients)
*Makes 8-10 bars*
The Base:
-
1 cup Rolled Oats (use gluten-free if needed)
-
1 cup Vanilla or Chocolate Protein Powder (whey, casein, or a blend works best for texture; plant-based may yield a drier bar)
-
½ cup Natural Peanut Butter (or almond butter, well-stirred)
-
⅓ cup Honey or Maple Syrup (or agave for a vegan option)
-
¼ cup Coconut Oil (melted) or Unsweetened Applesauce (for a lower-fat version)
-
¼ cup Unsweetened Cocoa Powder
-
1 teaspoon Vanilla Extract
-
Pinch of Salt
Mix-Ins (Optional):
-
¼ cup Dark Chocolate Chips (plus extra for topping)
-
2 tablespoons Chia Seeds or Flaxseed Meal
-
¼ cup chopped Almonds or Walnuts
For the Chocolate Drizzle (Optional):
-
¼ cup Dark Chocolate Chips
-
1 teaspoon Coconut Oil
The Step-by-Step Method
Step 1: Line Your Pan
-
Line an 8×8 inch baking dish with parchment paper, leaving some overhang on the sides. This will make it easy to lift the bars out later.
Step 2: Mix the Dry Ingredients
-
In a large bowl, whisk together the rolled oats, protein powder, and cocoa powder. If using chia seeds or flax, add them now.
-
Stir in any chopped nuts at this stage as well.
Step 3: Mix the Wet Ingredients
-
In a separate microwave-safe bowl or small saucepan, combine the peanut butter, honey (or maple syrup) , and coconut oil.
-
Gently warm the mixture for 20-30 seconds in the microwave (or over low heat on the stove) until it’s soft and stirrable. Do not overheat.
-
Stir in the vanilla extract and a pinch of salt.
Step 4: Combine Wet and Dry
-
Pour the wet ingredients into the bowl with the dry ingredients.
-
Stir vigorously until everything is well combined. The mixture will be thick and sticky—this is exactly what you want.
-
If the mixture seems too dry and crumbly, add a tablespoon of water or milk at a time until it comes together. If it seems too wet, add a tablespoon more oats or protein powder.
Step 5: Press Into the Pan
-
Transfer the mixture to your prepared pan.
-
Place a piece of parchment paper or plastic wrap over the top and use your hands or the bottom of a glass to press the mixture down firmly and evenly. Press hard! This ensures the bars hold together.
Step 6: Add the Chocolate Drizzle (Optional)
-
In a small microwave-safe bowl, combine the dark chocolate chips and coconut oil.
-
Microwave in 20-second intervals, stirring between each, until smooth.
-
Drizzle the melted chocolate over the pressed bars.
Step 7: Chill and Slice
-
Place the pan in the refrigerator for at least 1-2 hours to firm up.
-
Once firm, use the parchment overhang to lift the block out of the pan.
-
Place it on a cutting board and use a sharp knife to slice into 8-10 bars.
Storage
-
Refrigerator: Store bars in an airtight container in the fridge for up to 2 weeks.
-
Freezer: These bars freeze beautifully! Wrap individually in parchment paper and store in a freezer bag for up to 3 months. Thaw in the fridge or at room temperature for a few minutes before eating.
Pro-Tips for Success
-
Protein Powder Matters: Whey and casein blends absorb liquid differently than plant-based proteins. If using a plant-based powder, you may need to add an extra tablespoon or two of liquid (water or milk) to get the right consistency.
-
Press Firmly: The number one reason homemade bars fall apart is not pressing them firmly enough into the pan. Really compact that mixture!
-
Sweetness Level: Taste your mixture before pressing it in. If you prefer it sweeter, add a little more honey or a pinch of stevia.
-
No-Bake Versatility: This same base recipe can be rolled into protein balls (just roll into balls and chill) for a quick grab-and-go snack.