This recipe is a classic for a reason! It’s essentially a variation of a traditional white bread or dinner roll dough. The combination of a fair amount of sugar and oil ensures the bread is soft, slightly sweet, and stays fresh for days.
This dough is incredibly versatile. As written, it will yield two classic sandwich loaves. However, you can also use it to make dinner rolls, cinnamon swirl bread, or even pizza dough.
Here is the method written out clearly, along with the timing and tips to ensure it works perfectly for you every single time.
The “Never Fail” Classic White Bread
This recipe produces a soft, golden-crusted loaf with a tender crumb. It’s perfect for sandwiches, toast, or just slathering with butter.
Ingredients
-
2 cups warm water (about 105-115°F / 40-46°C – think warm bath water)
-
¼ cup granulated sugar
-
1½ tablespoons active dry yeast (that’s about 1.5 packets)
-
1½ teaspoons salt
-
¼ cup vegetable oil (plus a little extra for greasing the bowl)
-
5½ cups all-purpose flour (plus more for dusting)
-
2 tablespoons butter, melted (for brushing the tops)
Instructions (Step-by-Step)
Phase 1: Proof the Yeast (5-10 minutes)
-
In the bowl of a stand mixer (or a very large mixing bowl), combine the warm water and granulated sugar. Stir until the sugar is mostly dissolved.
-
Sprinkle the active dry yeast over the surface of the water. Give it a quick stir.
-
Let it sit for 5-10 minutes until it becomes foamy and bubbly. This “proofing” step ensures your yeast is alive and active. If the mixture doesn’t foam, your yeast is dead, and you’ll need to start over.
Phase 2: Mix the Dough (10 minutes)
4. Add the salt and vegetable oil to the foamy yeast mixture.
5. Add the flour one cup at a time, mixing on low speed (or with a wooden spoon) until combined.
-
After adding about 4 cups, the dough will start to come together.
-
Continue adding flour slowly. You may not need the full 5½ cups. Stop when the dough pulls away from the sides of the bowl but still feels slightly tacky to the touch (not sticky-wet).
Phase 3: Knead (8-10 minutes)
6. If using a stand mixer: Use the dough hook and knead on low speed for about 6-8 minutes.
7. If kneading by hand: Turn the dough out onto a lightly floured surface. Knead, pushing the dough away with the heel of your hand and folding it back over itself, for about 8-10 minutes.
8. The dough is ready when it is smooth, elastic, and springs back when you poke it gently.
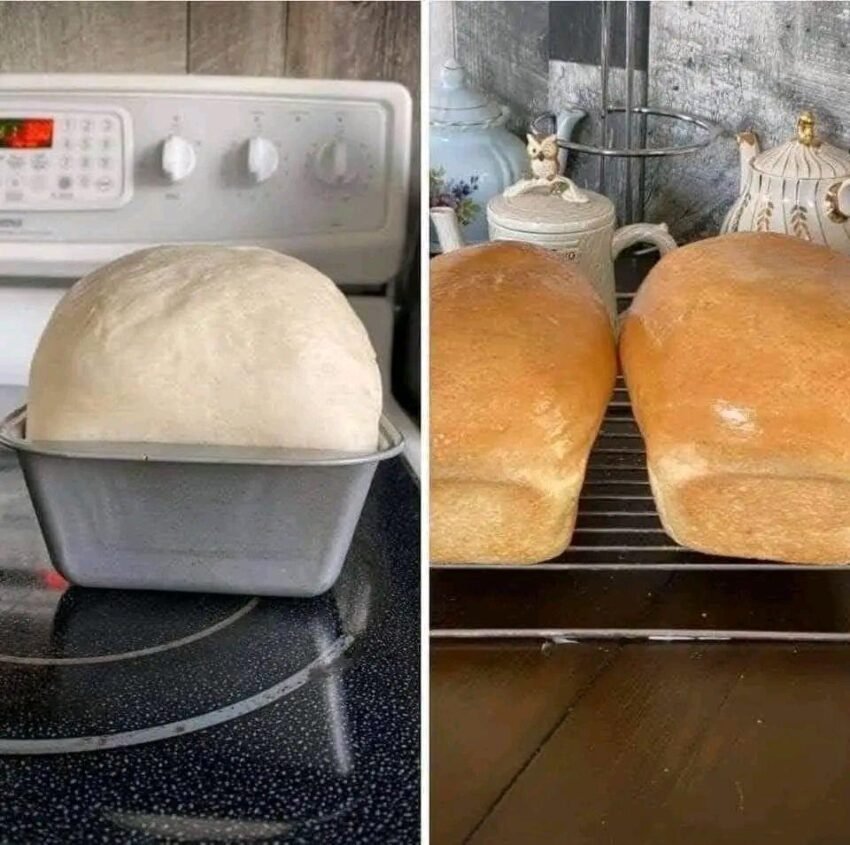
Phase 4: First Rise (1 – 1.5 hours)
9. Grease a large, clean bowl with a little vegetable oil.
10. Place the dough in the bowl, turning it once to coat all sides with oil. This prevents it from drying out.
11. Cover the bowl tightly with plastic wrap or a clean kitchen towel.
12. Let it rise in a warm, draft-free place until doubled in size. This usually takes about 60-90 minutes.
Phase 5: Shape the Loaves (10 minutes)
13. Punch the dough down gently to release the air.
14. Turn it out onto a lightly floured surface.
15. Divide the dough into two equal halves.
16. Shape each loaf: Roll or press each half into a rectangle (about 8×12 inches). Starting from the short end, roll the dough up tightly, pinching the seam as you go. Tuck the ends under and pinch them to seal.
17. Place each shaped loaf seam-side down into a greased 9×5-inch loaf pan.
Phase 6: Second Rise (30-45 minutes)
18. Cover the loaves loosely with a clean kitchen towel.
19. Let them rise in a warm place until the dough has risen about 1 inch above the rim of the pans. This will take about 30-45 minutes.
20. Towards the end of this rise, preheat your oven to 375°F (190°C) .
Phase 7: Bake (25-30 minutes)
21. Place the pans in the preheated oven.
22. Bake for 25-30 minutes. The loaves are done when they are golden brown on top and sound hollow when you tap the bottom.
23. Optional but recommended: If the tops are browning too fast, tent them loosely with aluminum foil for the last 10 minutes of baking.
Phase 8: Finish and Cool
24. As soon as the loaves come out of the oven, brush the tops with the melted butter. This gives them a soft, flavorful crust.
25. Let the bread cool in the pans for 10 minutes, then turn them out onto a wire rack to cool completely before slicing. (Slicing while hot can make the bread gummy).
Baker’s Tips for Success
-
Temperature is Key: If your water is too hot (over 130°F), it will kill the yeast. If it’s too cold, the yeast won’t activate. “Warm bath” temperature is perfect.
-
Measuring Flour: The most common mistake is using too much flour. Spoon the flour into your measuring cup and level it off with a knife, rather than scooping the cup directly into the bag (which compacts it).
-
Storing: This bread stays soft for days. Store it in an airtight container or plastic bag at room temperature for up to 4 days. It also freezes beautifully for up to 3 months.
Enjoy your perfect, never-fail bread