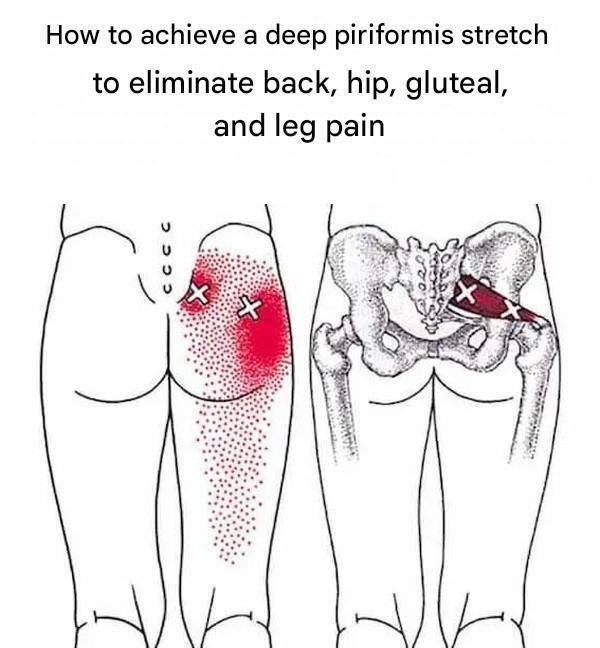
Dealing with pain that radiates from the back through the hip and down the leg is exhausting. Often, this isn’t just a muscle that feels “tight”—it’s a muscle that is neurologically locked up, guarding an unstable joint.
If you’ve been doing the standard Figure-4 stretch while sitting and it hasn’t worked, there’s a reason: the piriformis is a stubborn, deep stabilizer. When it’s in spasm, stretching it directly can sometimes make it angrier.
To truly release it, you need to differentiate between joint mobilization, mechanical compression, and active stretching. Here is the progression to eliminate that deep gluteal pain.
Phase 1: Joint Preparation (The Non-Negotiable First Step)
If your sacroiliac (SI) joint is locked, the piriformis will never release because it’s neurologically braced to protect the joint. Don’t stretch a muscle attached to a stuck joint.
The Pelvic Reset (Shotgun Technique)
-
Lie on your back, knees bent, feet flat.
-
Place a yoga block, thick book, or firm fist between your knees.
-
Squeeze your knees into the block hard (about 20-30% effort). You’ll feel your deep core and glutes engage.
-
While squeezing, gently tilt your pelvis posteriorly (flatten your back into the floor), then anteriorly (arch slightly). Do this rocking motion slowly 10 times.
-
Why this works: The adductor squeeze activates the pelvic floor and resets the SI joint alignment, giving the piriformis a stable foundation.
Phase 2: Mechanical Release (Stop Stretching, Start Smashing)
The piriformis is deep under the glute max. You can’t stretch tissue that is in a state of ischemic cramp.
90/90 Hip Switch with PNF
This separates the femur from the pelvis without pulling a cold muscle.
-
Sit on the floor. Place your right leg in front at a 90-degree angle, left leg out to the side at 90 degrees (like a modified pigeon pose, but you’re upright).
-
Don’t lean forward yet. Place your hands on the floor beside your hips.
-
Attempt to drive the front knee into the ground while simultaneously lifting the front heel. Hold for 5 seconds.
-
Now release, and attempt to slide the front foot forward.
-
Crucial Do Not Do: Do not allow the pelvis to hike up; keep both sitting bones heavy.
Phase 3: The Deep Piriformis Stretch (Traction-Based)
A standard pigeon pose crunches the hip joint. For a high, tight piriformis entrapment, you need distraction (pulling the joint apart) before rotation.
The Figure-4 with Band Distraction
This is the most effective method for eliminating radiating leg pain because it creates space for the sciatic nerve.
-
Lie on your back, loop a heavy resistance band (or a belt/towel) around a sturdy table leg or door anchor.
-
Loop the other end around your foot/ankle of the painful leg. The band should be pulling your leg away from your body so your hip feels slight traction.
-
Cross your opposite ankle over the knee of your painful leg.
-
Grab the back of the thigh of the painful leg and pull it toward your chest.
-
The Key: Instead of just pulling the leg straight back, use your elbow to push the crossed leg’s knee away from you while pulling the thigh toward you.
-
Hold for 30 seconds; you should feel the stretch deep in the lateral glute, not a pinch in the front of the hip.
Phase 4: Active Range of Motion (Re-Education)
A stretched muscle that doesn’t know how to contract will just spasm again. You must teach the muscle to move through its new range.
Piriformis Eccentric Pigeon
-
Get on all fours. Slide your right knee toward your right wrist, turn the shin so the foot is near the left wrist (Thread the Needle or Sleeping Pigeon).
-
Slide the left leg straight back. You are now in Pigeon Pose.
-
Stay on your hands. Keep your hips square.
-
Slowly sit your hips back toward your left heel, then use your glutes to pull yourself back up to center.
-
The magic cue: Imagine you’re pulling your thigh bone backward out of the hip socket as you press up with your hands. Do 8 slow reps.
The Emergency “Nerve Flossing” Fix
If you have buzzing, numbness, or shocking pain down the leg, the sciatic nerve is stuck to the piriformis. Stretching makes it worse. You need to floss the nerve first.
Seated Sciatic Nerve Glide
-
Sit on a high chair, slumped over slightly (chin to chest, looking down).
-
Straighten the painful leg until you feel a mild stretch in the back of the leg. Stop there.
-
With the leg still extended, lift your head and look at the ceiling.
-
Drop your head down again.
-
Repeat 10 times. Do not push the leg further if it hurts; just move the head.
Critical Warnings: When NOT to follow this advice
If you feel centralizing symptoms or have bilateral sciatica, do not stretch.
-
Beware the Saddle: If you lose sensation in your inner thighs or groin (saddle anesthesia), stop immediately; this is a cauda equina red flag.
-
The Deep Gluteal Syndrome Trap: If this routine doesn’t change your symptoms within 3 days, the source is likely not the piriformis but the obturator internus or gemelli. That requires internal rotation stretching (Knees Apart Seat), not external rotation.
Focus on the Band Distraction Figure-4 (Phase 3) tonight. Don’t just stretch—distract and compress. You’re trying to pry open a space, not just pull a rope. Let me know how it responds.