
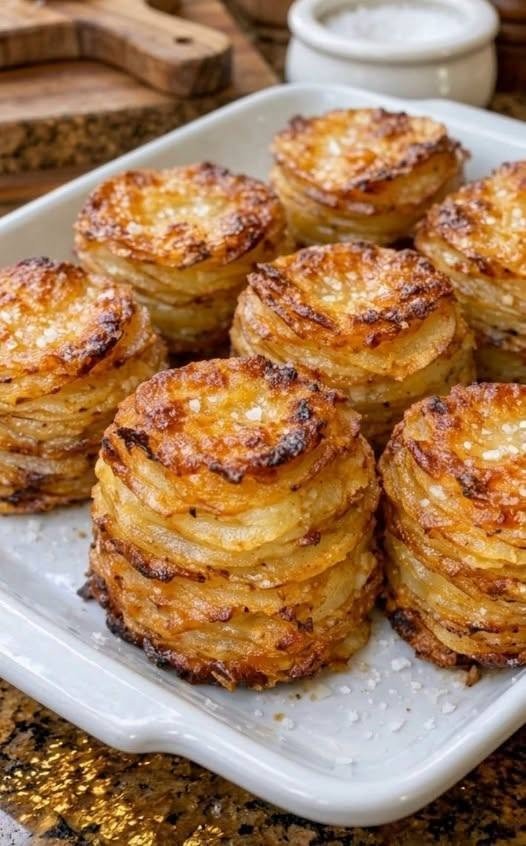
Here is a recipe and guide for making Cheesy Potato Stacks—a visually impressive, deliciously crispy, and buttery side dish that is surprisingly easy to assemble.
Cheesy Potato Stacks (Muffin Tin Potatoes)
If you are looking for a side dish that looks like it came out of a five-star restaurant kitchen but is actually easier than making mashed potatoes, look no further.
Cheesy Potato Stacks are essentially individual servings of thinly sliced potatoes layered with butter, herbs, and melted cheese, baked in a muffin tin until the edges are crispy and golden brown while the insides remain tender and creamy. They are the perfect hybrid of a potato chip, a scalloped potato, and a soufflé.
Here is how to make them perfectly every time.
Why This Recipe Works
The secret to this dish is the muffin tin. By packing the potatoes vertically into individual cups, you maximize the surface area exposed to the heat of the oven. This means every single stack gets a crispy, crunchy exterior—no more fighting over the crispy edge pieces in a traditional casserole dish.
Ingredients
-
4-5 medium Russet or Yukon Gold potatoes (Yukon Golds hold their shape beautifully and have a buttery flavor; Russets get slightly crispier). Approximately 2 lbs.
-
4 tablespoons unsalted butter, melted
-
1 teaspoon garlic powder (or 2 cloves fresh garlic, minced)
-
1 teaspoon fresh thyme leaves (or 1/2 tsp dried thyme/rosemary)
-
1 teaspoon salt (plus more for the water)
-
1/2 teaspoon black pepper
-
1 to 1 ½ cups shredded cheese (A mix of Gruyère and Parmesan is gourmet, but sharp Cheddar, Fontina, or Mozzarella work great for that cheese pull.)
-
1/2 cup heavy cream or half-and-half (optional, for extra richness)
-
Fresh parsley or chives, for garnish
Equipment: A standard 12-cup muffin tin, a mandoline slicer (highly recommended) or a very sharp knife, and a pastry brush.
Instructions
Step 1: Prep the Oven and Pan
Preheat your oven to 400°F (200°C).
Generously brush the cups of your muffin tin with some of the melted butter. Do not skimp here; this is what fries the bottoms of the potatoes to a golden crisp and prevents sticking.
Step 2: Slice the Potatoes Paper-Thin
Wash and scrub the potatoes. Do not peel them—the skin adds texture and nutrients.
Using a mandoline slicer set to about 1/16-inch (1.5mm) thickness, slice the potatoes into thin rounds. If you are using a knife, slice them as thin as you possibly can. The thinner the slices, the more they will stack and meld together.
Pro Tip: Do not soak the potatoes in water. You actually want the starch to remain in the potatoes. The starch acts as a natural glue that binds the stack together as it bakes.
Step 3: Season the Potatoes
Place the sliced potatoes in a large mixing bowl. Pour the remaining melted butter over them. Add the garlic powder (or minced garlic), thyme, salt, and pepper. Toss with your hands, making sure every single slice is coated in the buttery, herby mixture.
Step 4: Layer with Cheese
Grab a small handful of potato slices and begin layering them in the muffin tin.
The technique: Place one slice down, sprinkle a tiny pinch of cheese, place another slice on top, sprinkle more cheese, and repeat until the stack reaches the top rim of the muffin cup.
Pro Tip: Do not fill them above the rim. As the potatoes cook, they shrink slightly. If you stack them too high, they topple over. A stack about 1 to 1.5 inches tall is perfect.
Step 5: The Final Drizzle
If using heavy cream, spoon about 1 teaspoon of cream over the top of each potato stack. This seeps down through the layers and creates an unbelievably creamy texture inside the crispy shell.
Top each stack with a final generous pinch of the remaining shredded cheese.
Step 6: Bake Covered, Then Uncovered
The challenge with potato stacks is making sure the inside cooks before the outside burns.
-
Cover the muffin tin loosely with aluminum foil.
-
Bake for 20 minutes.
-
Remove the foil and bake for another 15–20 minutes, or until the tops are deeply golden brown and a fork inserted into the center of a stack slides in with zero resistance.
Step 7: The Crucial Rest
Remove the pan from the oven and let the potato stacks rest in the pan for 5 minutes. This is essential! If you try to pop them out immediately, they will fall apart. The resting time allows the cheese to set and the starches to firm up.
Use a small butter knife or an offset spatula to run around the edges, then gently lift them out.
Variations & Tips
-
The Garlic Parm Version: Swap the thyme for Italian seasoning, use only Parmesan cheese, and serve with a side of warm marinara sauce for dipping.
-
The Loaded Baked Potato Version: Once out of the oven, top each stack with a dollop of sour cream, crispy bacon bits, and chives.
-
Make them ahead: You can assemble the stacks in the muffin tin, cover them with plastic wrap, and keep them in the fridge for up to 24 hours before baking. You may just need to add 5 extra minutes to the covered baking time since they will start cold.
What to Serve Them With
These cheesy stacks are incredibly versatile. They are a show-stopper alongside a holiday prime rib or roasted chicken, but they are casual enough to serve with meatloaf or a simple green salad on a Tuesday night.
The result? A crispy, buttery, oniony (if you choose to add onion powder), cheesy tower of potato goodness that peels away layer by layer. Good luck getting your family to ever accept plain roasted potatoes again.