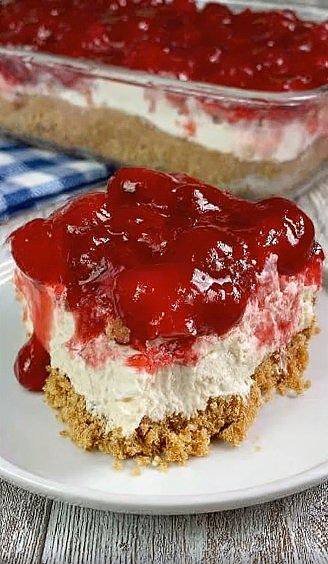
Easy No-Bake Cherry Cheesecake
This classic dessert is the ultimate in simplicity and nostalgia—a creamy, tangy filling on a buttery graham cracker crust, topped with sweet cherry pie filling. No oven required, and it’s perfect for warm days or when you need a quick, crowd-pleasing treat.
Ingredients
For the Graham Cracker Crust:
-
1 ½ cups (150g) graham cracker crumbs (about 10-12 full sheets)
-
⅓ cup (67g) granulated sugar
-
6 tablespoons (85g) unsalted butter, melted
-
Pinch of salt
For the No-Bake Cheesecake Filling:
-
2 (8 oz / 225g) packages full-fat cream cheese, softened to room temperature
-
1 cup (120g) powdered sugar, sifted
-
1 teaspoon pure vanilla extract
-
1 tablespoon fresh lemon juice (about ½ lemon)
-
1 (8 oz) tub frozen whipped topping (like Cool Whip), thawed
For the Topping:
-
1 (21 oz) can cherry pie filling (or blueberry, strawberry, etc.)
-
Optional garnish: Fresh mint, extra whipped cream
Step-by-Step Instructions
Part 1: Make the Crust
-
In a medium bowl, stir together the graham cracker crumbs, sugar, and salt.
-
Pour in the melted butter and mix until the crumbs are evenly moistened and resemble wet sand.
-
Press the mixture firmly and evenly into the bottom of a 9-inch springform pan or pie dish. Use the bottom of a glass or measuring cup to press it down tightly.
-
Place the crust in the refrigerator to set while you make the filling (at least 15 minutes).
Part 2: Make the Cheesecake Filling
-
In a large bowl, beat the softened cream cheese with an electric mixer on medium speed until completely smooth and lump-free (about 2 minutes).
-
Add the sifted powdered sugar, vanilla, and lemon juice. Beat again until fully combined and smooth, scraping down the sides of the bowl as needed.
-
Gently fold in the thawed whipped topping with a spatula until the mixture is uniform and no white streaks remain. Be gentle to keep it light and fluffy.
Part 3: Assemble & Chill
-
Remove the chilled crust from the refrigerator. Spoon the cheesecake filling onto the crust and spread it evenly with a spatula.
-
Cover the pan loosely with plastic wrap and refrigerate for at least 4 hours, but preferably overnight, to allow the cheesecake to set firmly.
Part 4: Top & Serve
-
Just before serving, open the can of cherry pie filling and spoon it evenly over the top of the chilled cheesecake.
-
If using a springform pan, run a knife around the edge before releasing the clamp.
-
Slice and serve cold. Garnish with a dollop of extra whipped cream or fresh mint if desired.
Pro-Tips for the Perfect No-Bake Cheesecake
-
Room Temperature Cream Cheese: This is non-negotiable! Cold cream cheese will leave lumps in your filling.
-
Press the Crust Firmly: A well-packed crust won’t crumble when sliced.
-
Chill Thoroughly: The long chilling time is what allows the cheesecake to slice cleanly. Don’t rush it.
-
Customize Your Topping: Use any canned fruit pie filling you love—blueberry, strawberry, or apple are all delicious. You can also top with fresh macerated strawberries.
-
Make it Lighter: Use reduced-fat cream cheese and light whipped topping (though full-fat will yield the best texture and flavor).
-
No Whipped Topping? Make your own stabilized whipped cream: Whip 1 ½ cups of cold heavy cream with ¼ cup powdered sugar and 1 tsp vanilla until stiff peaks form, then fold into the cream cheese mixture.
Storage
-
Store covered in the refrigerator for up to 4 days.
-
This cheesecake does not freeze well due to the whipped topping/filling texture.
Enjoy this effortless, creamy, and delightfully retro dessert that’s sure to bring a smile!