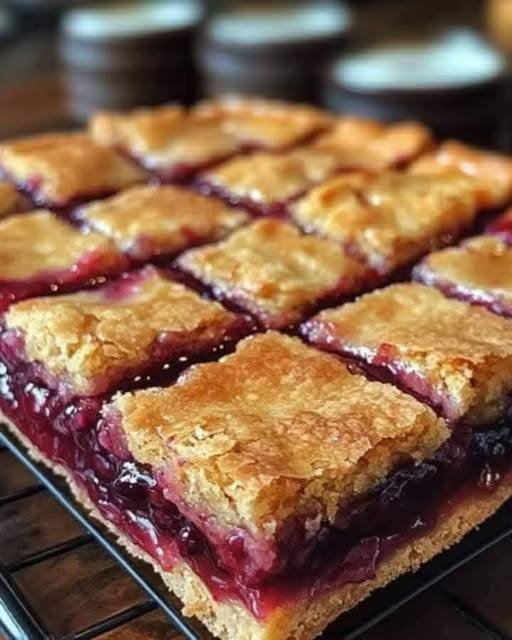
Cherry Pie Bars are the perfect dessert bar—all the sweet, fruity, buttery goodness of a cherry pie, but in an easy-to-make, portable, shareable bar form. They feature a tender, slightly sweet shortbread crust, a layer of luscious cherry pie filling, and a buttery crumb topping that bakes to golden perfection. They’re ideal for potlucks, bake sales, or simply enjoying with a cup of coffee.
Here is a comprehensive guide to making the most delicious cherry pie bars.
The Concept: Pie, Reimagined as a Bar
These bars are built in three simple, delicious layers:
The Crust: A buttery, press-in shortbread-style crust that forms the sturdy base.
The Filling: A generous layer of sweet-tart cherry pie filling (homemade or canned).
The Topping: A buttery, crumbly streusel that bakes into a golden, slightly crunchy crown.
The Ultimate Recipe
This recipe is for a 9×13-inch baking pan, making about 24 bars.
Ingredients
For the Crust and Topping:
3 cups all-purpose flour
1 cup granulated sugar
1 cup (2 sticks) unsalted butter, cold and cut into small cubes
1 teaspoon baking powder
½ teaspoon salt
1 large egg, lightly beaten
1 teaspoon vanilla extract
Optional: ¼ teaspoon almond extract (enhances the cherry flavor beautifully)
For the Cherry Filling:
2 (21-oz) cans cherry pie filling (or about 4 cups homemade cherry pie filling)
Optional: 1 tablespoon lemon juice (if using canned filling, to brighten the flavor)
Optional: ¼ teaspoon almond extract (added to the filling)
For the Glaze (Optional, but Recommended):
1 cup powdered sugar
2-3 tablespoons milk or heavy cream
½ teaspoon vanilla or almond extract
Instructions
1. Preheat and Prepare
Preheat your oven to 350°F (175°C) .
Grease a 9×13-inch baking pan thoroughly with butter or non-stick spray. For easiest removal, line the pan with parchment paper, leaving an overhang on the long sides.
2. Make the Crust/Topping Mixture
In a large bowl, whisk together the flour, sugar, baking powder, and salt.
Cut in the cold butter cubes using a pastry blender, two forks, or your fingertips until the mixture resembles coarse meal with pea-sized butter pieces. (Some larger butter bits are good—they create flakiness.)
Add the beaten egg, vanilla extract, and almond extract (if using). Stir with a fork until the mixture is evenly moistened and clumps together. It will be crumbly.
3. Press the Crust
Reserve about 1 ½ cups of this crumb mixture for the topping. Set it aside.
Press the remaining crumb mixture firmly and evenly into the bottom of the prepared pan. Use the bottom of a flat measuring cup or glass to pack it down tightly.
4. Add the Filling
If using canned pie filling, stir in the lemon juice and almond extract (if using) to brighten the flavor.
Spread the cherry pie filling evenly over the crust, all the way to the edges.
5. Add the Topping
Sprinkle the reserved crumb mixture evenly over the cherry filling. Squeeze some of the crumbs together to create larger clumps for a more interesting texture.
6. Bake
Bake for 35-45 minutes, until the topping is golden brown and the filling is bubbly around the edges.
Place the pan on a wire rack and let the bars cool completely in the pan. This is essential for clean slicing. The filling needs time to set.
7. Add the Glaze (Optional)
Once the bars are completely cool, whisk together the powdered sugar, milk, and extract until smooth. The glaze should be thick but drizzle-able.
Drizzle the glaze over the bars using a spoon or a piping bag with a tiny tip cut off.
Let the glaze set for about 15-20 minutes before slicing.
8. Slice and Serve
Use the parchment paper overhang to lift the bars out of the pan. Place on a cutting board.
Use a sharp knife to slice into squares or bars. For clean cuts, wipe the knife clean between slices.
Why These Bars are Irresistible
Buttery, Tender Crust: The shortbread-style crust is rich and melt-in-your-mouth tender.
Fruity, Sweet Filling: The cherry filling provides the perfect pop of fruity flavor.
Crumbly, Golden Topping: The streusel adds texture and a buttery crunch.
Perfectly Portable: No forks or plates needed—just grab and go.
Tips for “Perfect Bar” Success
Keep the Butter Cold: Cold butter is essential for a tender, flaky crust. If the butter warms up too much, the crust can become dense.
Press the Crust Firmly: A loosely packed crust will fall apart when you try to lift the bars. Pack it down well.
Cool Completely: This is the hardest part, but it’s crucial. Warm bars will be a gooey, crumbly mess. Patience rewards you with clean, beautiful slices.
Use a Sharp Knife: A sharp knife ensures clean cuts without dragging the filling through the bars. Wipe it clean between cuts for the prettiest presentation.
Enhance Canned Filling: A little lemon juice and almond extract can make canned pie filling taste almost homemade.
Variations to Try
Other Fruit Fillings: This recipe works beautifully with any canned pie filling—apple, blueberry, peach, or strawberry.
Fresh Cherry Filling: Use 4 cups of fresh or frozen pitted cherries, cooked down with ¾ cup sugar, 2 tablespoons cornstarch, and 1 tablespoon lemon juice until thickened.
Lemon Cherry: Add 1 tablespoon of lemon zest to the crust mixture for a bright, citrusy note.
Chocolate Cherry: Stir ½ cup mini chocolate chips into the reserved topping mixture.
Nutty Crunch: Add ½ cup chopped pecans or almonds to the crumb topping.
Storage
Room Temperature: Store in an airtight container at room temperature for up to 3 days.
Refrigerator: Store in the refrigerator for up to a week. The bars are delicious cold or at room temperature.
Freezer: These bars freeze beautifully! Wrap individual bars or the whole pan tightly in plastic wrap and then foil. Freeze for up to 3 months. Thaw in the refrigerator or at room temperature.
Enjoy your beautiful, delicious Cherry Pie Bars!